VisionOS Dev: Taylor's Opinionated and Already-Outdated Guide (2024)
There is no substitute for project-based learning! Briefly skim this guide, and go try to build something with it. Come back whenever you find a lapse in understanding.
- Scaffolding Your Project: #Preview, AppState, MyApp, ContentView, ImmersiveView, Configuration
- Display Containers: Scenes, Windows, Volumes, 3D Immersive Space
- Displaying Things: SwiftUI Views, RealityView
- Entities: Hierarchies, Enabling/Disabling, Loading Entities, Transforms, Physics, Anchors
- Sensing Stuff
- Gestures: InputTargetComponent, Input Types, Gesture Types, Gesture Hand Poses, Gesture Ambiguity, Hand Shapes
- On Your Own: Starter Projects, Videos
Apple recently announced VisionOS 2.0. Some of the updates are not covered in this guide.
All writings on taylor.town (including this guide) are available in
plaintext, i.e. taylor.town/visionos.txt. To download for
offline access, try
curl https://taylor.town/visionos.txt > taylor-town-visionos.md.
This guide is still under construction! Please email me at [email protected] if you have any questions or suggestions.
Scaffolding Your Project
Here is what a typical VisionOS app looks like:
MyApp: main entry point to call content and immersive viewsAppState: stores/manages all the state for the appContentView: 2d window(s) and 3d volumesImmersiveView: 3d whatever
@Observable
@MainActor
public class AppState {...}

@main
@MainActor
struct MudPieApp: App {...}

struct ContentView: View {...}
#Preview(windowStyle: .automatic) {...}

struct ImmersiveView: View {...}
#Preview(immersionStyle: .mixed) {...}
#Preview
Use #Preview macros to create default simulator views in XCode.
#Preview( "Content", traits: .fixedLayout(width: 100, height: 100)) {
    ContentView()
}
#Preview("Volume", windowStyle: .volumetric) {
ContentView()
}#Preview("Mixed immersive space", immersionStyle: .mixed) {
ContentView()
}#Preview("Mixed immersive space", immersionStyle: .mixed) {
ContentView()
} cameras: {
PreviewCamera(from: .front)
PreviewCamera(from: .top, zoom: 2)
PreviewCamera(from: .leading, zoom: 0.5, name: "close up")
}AppState
@Observable
@MainActor
public class AppState {
  var session = ARKitSession()
  var worldTracking = WorldTrackingProvider()
  var handTracking = HandTrackingProvider()
  var myEntity = Entity()
  // ...more members
  init() {
    Task {/* request tracking privs */}
    Task {/* load entities */}
    Task {/* etc */}
  }
}
Further reading: Task, TaskGroup
This is a singleton class. If you keep your views pure/memoryless, it becomes the sole place where all state is stored across your app. Updates to the instance propagate to all your views via Swift framework magic.
Most frontend development involves complex state management. I highly recommend adopting Elm's architecture paradigm into your mental toolkit.
But this mental model will only take you so far. As you'll find out later, entities force you to break the classic MVC paradigm by storing "view" details in your model. The shape/position/texture/etc. of your entities are mutable, and references to these entities must be persisted somewhere.
If you're a web-dev like me, working with entity hierarchies feels like direct DOM manipulation.
Don't be afraid! It's okay. Just exercise caution with your "sources of truth". For example, an entity's current color is a "true" value, not some copied value in a corresponding color picker.
Other bits of unsolicited advice:
- Avoid adding methods to your AppState. You'll find that the vast majority of entity is only ever used in one place.
- Favor "wide" over "deep", i.e. don't be afraid to pile countless members in your AppState; the only alternative is a deeply-nested class hellscape.
MyApp
@main
@MainActor
struct MyApp: App {
  @StateObject private var appState = AppState()
  @State private var immersionStyle: ImmersionStyle = .automatic
  var body: some SwiftUI.Scene {
    WindowGroup { ContentView().environmentObject(appState) }
    ImmersiveSpace(id: "MY_SPACE") { ImmersiveView().environment(appState) }
      .immersionStyle(selection: $immersionStyle, in: .automatic)
  }
}
There's a lot to unpack here! For now, just note the general structure:
- this struct is your app's main entry point
- it stores appState, which syncs to ContentView and ImmersiveView
- these views can (and will) mutate appState object, and that's okay
- the app will typically default to opening the WindowGroup and ignoring the ImmersiveSpace (more on this later)
ContentView
struct ContentView: View {
  @Environment(AppState.self) private var appState
  var body: some View {
    // windows, volumes, etc.
  }
}
#Preview(windowStyle: .automatic) {
  ContentView().environment(AppState())
}
Put all your bounded, position-agnostic views here. The initial placement of windows/volumes can be suggested, but the size and position of the content is ultimately determined by VisionOS and its user.
ImmersiveView
struct ImmersiveView: View {
  @Environment(AppState.self) var appState
  var body: some View {
    RealityView { content, attachments in
      // add attachments and MyApp entities to `content`
    } update: { content, attachments in
      // runs when ImmersiveView properties change
    } attachments: {
      Attachment(id: "MY_ATTACH) {/* SwiftUI window/volume that will be converted into an entity */}
    }
    .gesture(/* listen for gesture targeted at entity */)
    // ...more gestures
  }
}
#Preview(immersionStyle: .mixed) {
  ImmersiveView().environment(AppState())
}
Whoa! Lots of stuff going on here. Much of this guide will be exploring the details here, so don't overwhelm yourself.
Heres' the gist:
- RealityView gives you a place to declare attachments, which are manipulatable SwiftUI windows/volumes.
- Add your attachments and AppState entities to
contentin the first closure. - Use
updateto handle subsequent changes to the ImmersiveView. Keep in mind that you probably don't want to use this; you probably want to manage systems and other async stuff in your AppState. - Prepare yourself for lots of gestures.
Configuration
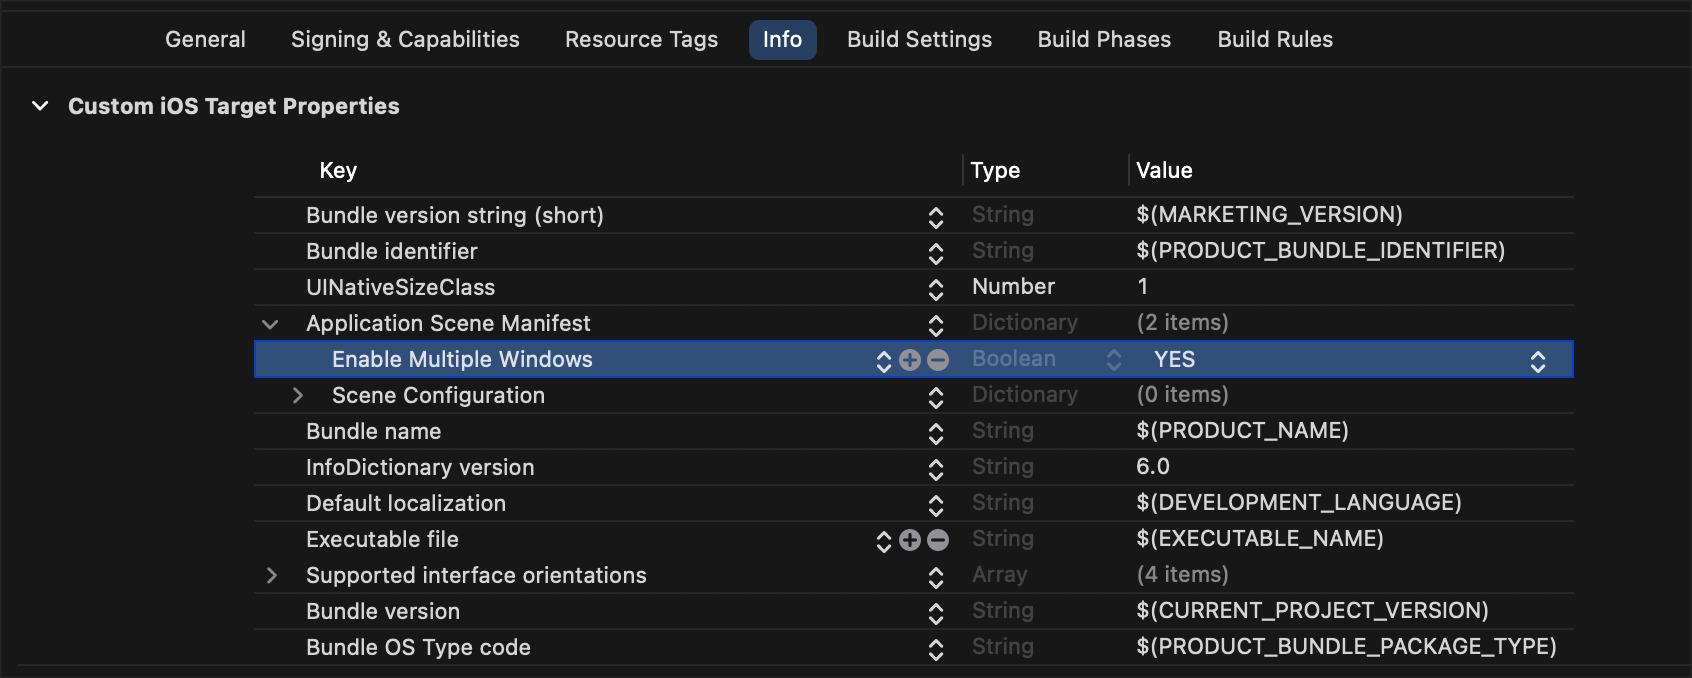
Here's a bunch of Info.plist junk you may need:
- multiple windows
- initial scene style
- initial immersion style
- hand-tracking permission
- world-sensing permission
- motion-tracking permission
- game controller required
- supported game controllers
- background UI config
Display Containers
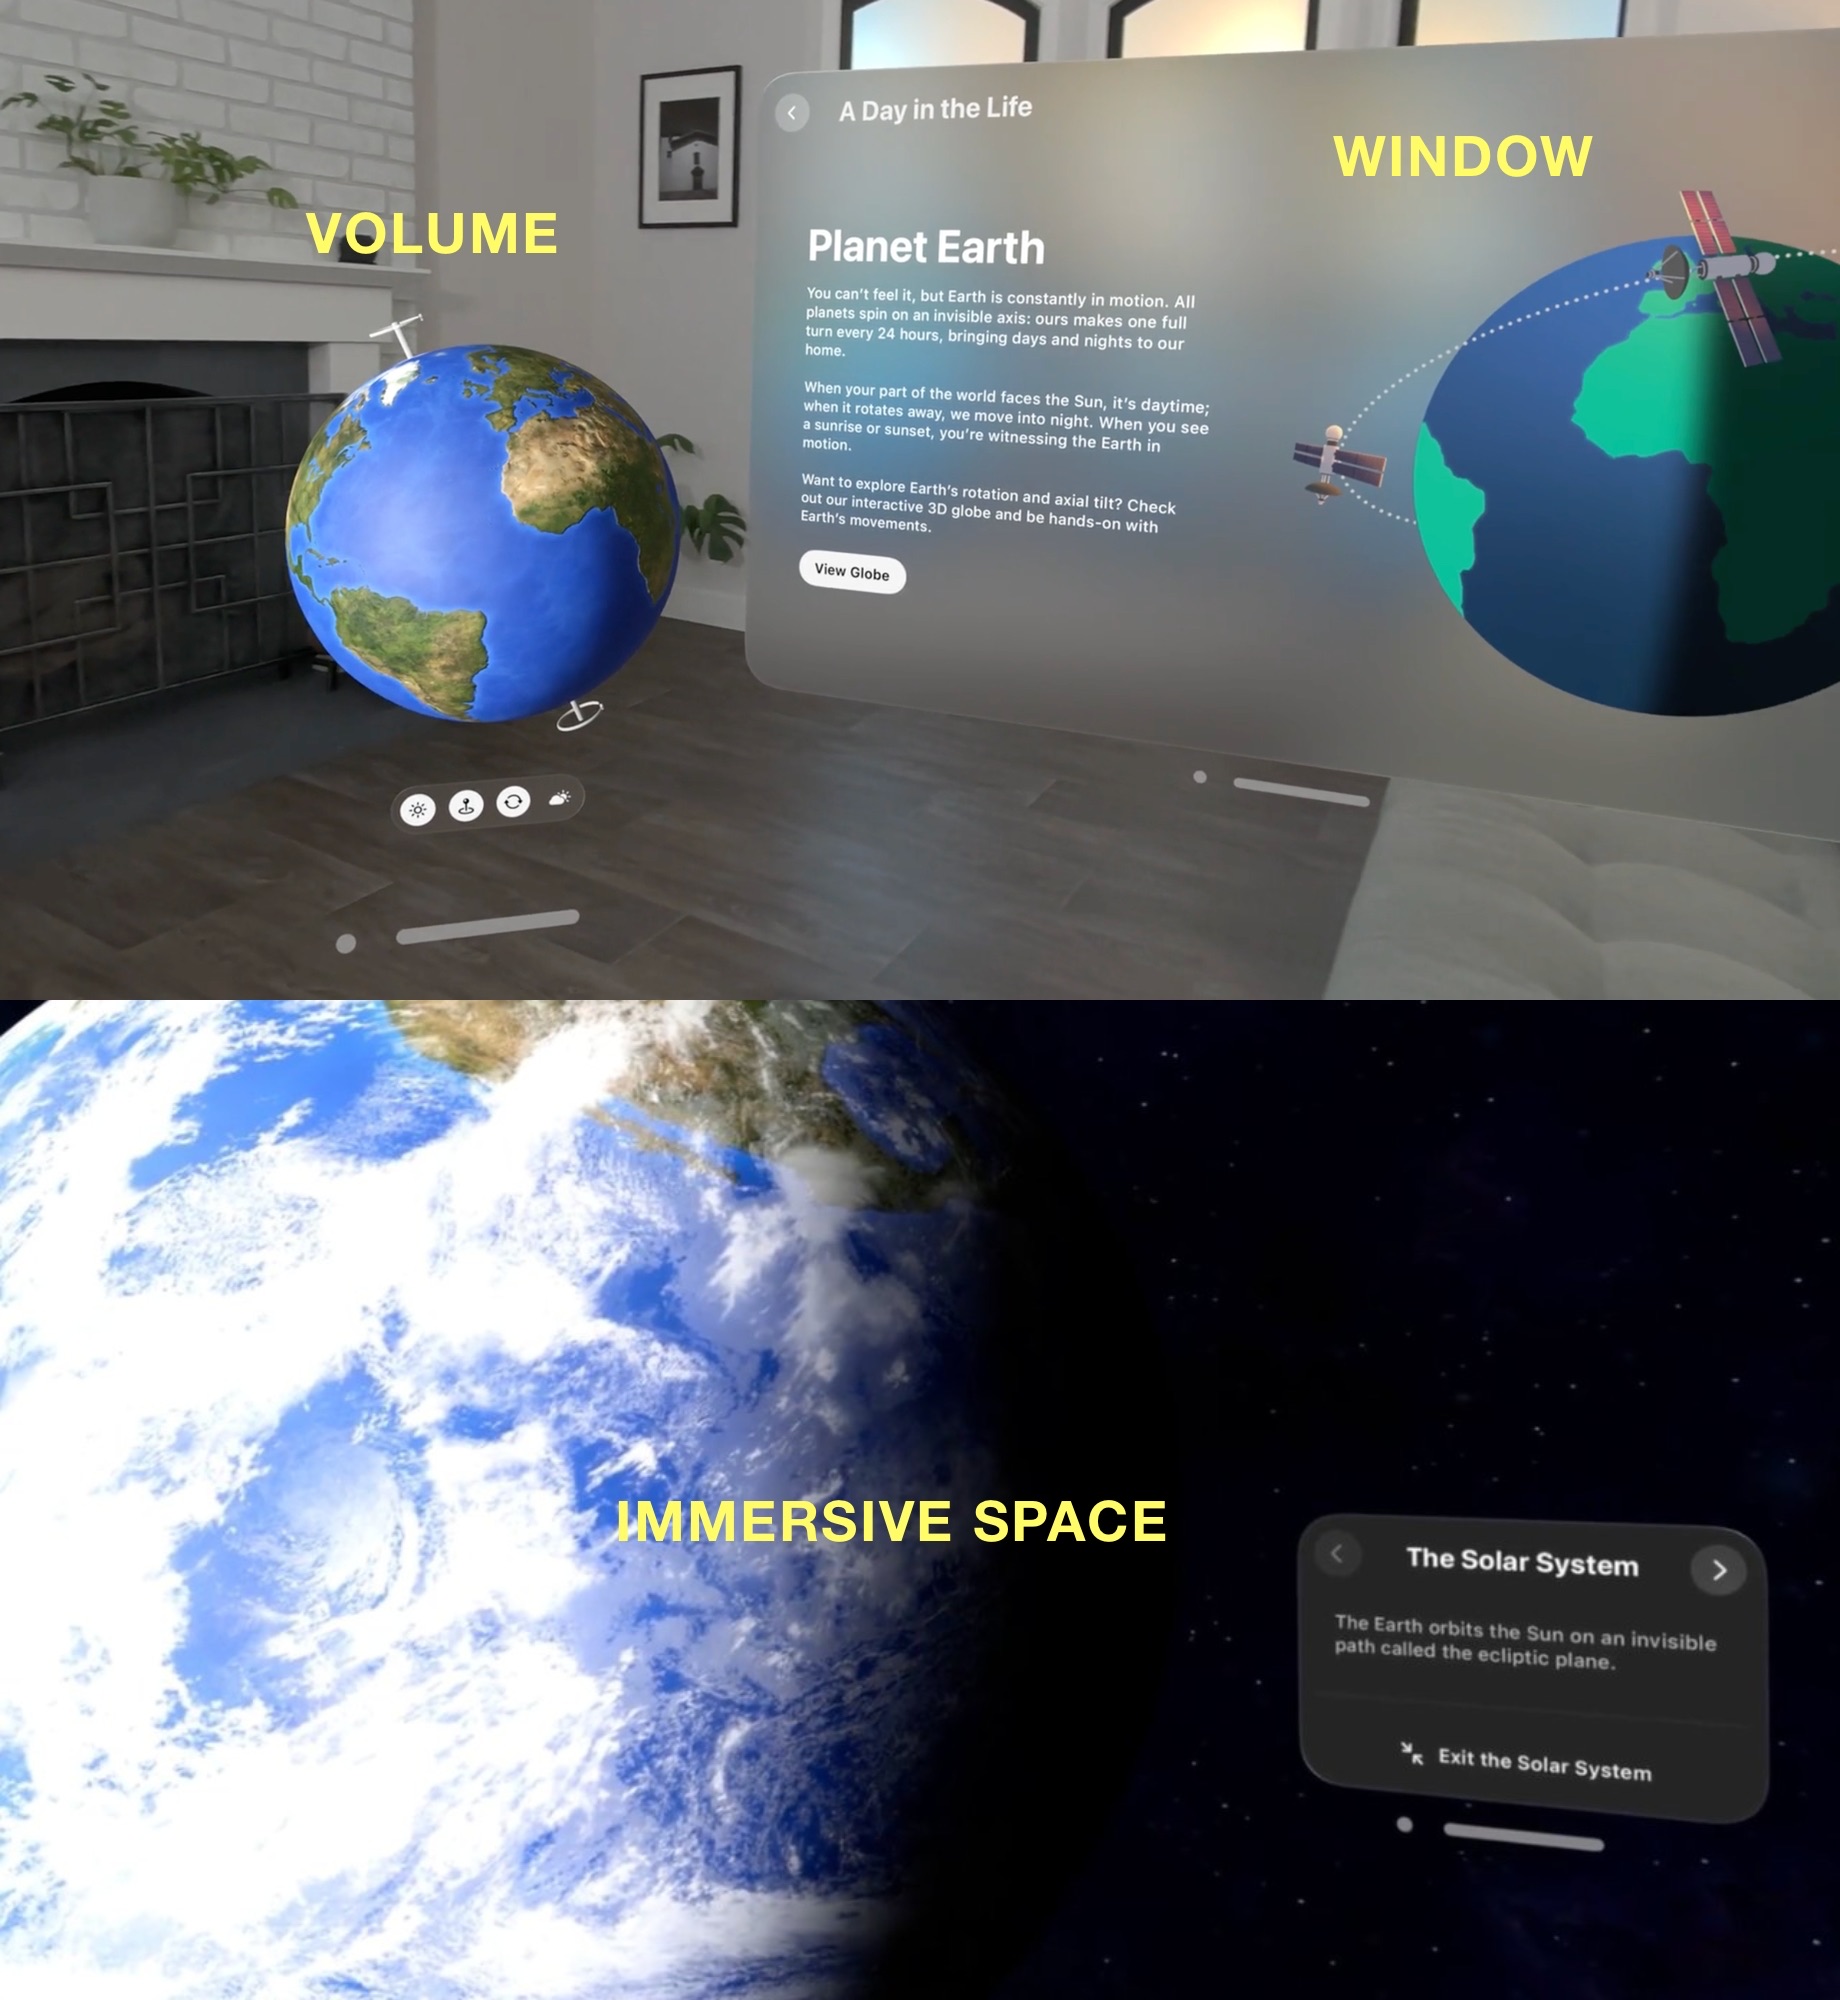
SceneContentView: 2D/3D windows that are sized/positioned by VisionOS and userImmersiveView: arbitrarily placed 2D/3D content, with some restrictions
3D windows are called "volumes". They behave just like windows, but with a few quirks and restrictions.
2D windows can have limited 3D depth, e.g. hovering,. You can also display 3D content/models floating inside/outside of 2D windows.
You can use SwiftUI views (e.g. buttons, sliders) inside of 3D immersive spaces as "attachments".
Scenes
@main
@MainActor
struct MyApp: App {
  @StateObject private var appState = AppState()
  @State private var immersionStyle: ImmersionStyle = .automatic
  var body: some SwiftUI.Scene {
    WindowGroup { ContentView().environmentObject(appState) }
    ImmersiveSpace(id: "MY_SPACE") { ImmersiveView().environment(appState) }
      .immersionStyle(selection: $immersionStyle, in: .automatic)
  }
}
The default behavior of your scene is largely determined by Info.plist junk:
- To enable multiple scenes in visionOS, set UIApplicationSupportsMultipleScenes to true in the UIApplicationSceneManifest of the app’s property list.
- visionOS opens the first window group, window, or document scene found in the app’s body. To open an app directly into an immersive space in visionOS, set UIApplicationPreferredDefaultSceneSessionRole to UISceneSessionRoleImmersiveSpaceApplication in the app’s property list.
- To configure the default immersion type from launch, set UISceneInitialImmersionStyle to mixed, full, or progressive.
It is unclear if .immersionStyle(selection: ..., in: .full) will override
UISceneInitialImmersionStyle. I'll report back here with some experimental
findings.
Immersive spaces are somewhat like fullscreen experiences for VisionOS. When opening an ImmersiveSpace, VisionOS hides the content (e.g. Windows) of other apps.
struct OpenImmersiveSpaceButton: View {
  var solarSystem: SolarSystem
  @Environment(\.openImmersiveSpace) private var openImmersiveSpace
  var body: some View {
    Button("Open Immersive Space") {
      Task {
        let result = await openImmersiveSpace(id: "MY_SPACE")
        if case .error = result {
          print("An error occurred")
        }
      }
    }
  }
}
struct DismissImmersiveSpaceButton: View {
  @Environment(\.dismissImmersiveSpace) private var dismissImmersiveSpace
  var body: some View {
    Button("Close Solar System") {
      Task { await dismissImmersiveSpace() }
    }
  }
}
Use the environment's openImmersiveSpace(id) and dismissImmersiveSpace() to
switch between the immersive spaces in your scene. Only one immersive space can
be open at a time; you must dismiss any open spaces before opening up new ones.
VisionOS will not automatically replace the space for you -- it will throw an
error.
In a fully immersive experience, visionOS sets a 1.5-meter boundary from the user’s head. Moving outside this zone stops the immersive experience and activates external video to prevent collisions.
The user can manually dismiss an immersive space by double-tapping the
digital crown on the AVP headset, so dismissImmersiveSpace isn't
technically required. Double-tapping takes you "back" to all your
previously-opened windows.
![]()
Your scene is the primary place to hang your anchors:
To add content to the view’s scene, you first create and add one or more AnchorEntity instances to the scene’s anchors collection. Anchors tell RealityKit how to pin virtual content to real world objects, like flat surfaces or images. You then add a hierarchy of other Entity instances to each anchor to indicate the geometry and behaviors that RealityKit should render at a given anchor point.
You'll probably want to hang virtual content (entities) on these anchors. Although physics/collision primitives handle many interactive cases, you'll probably need more specific tools to determine whether your entities meet spatial conditions.
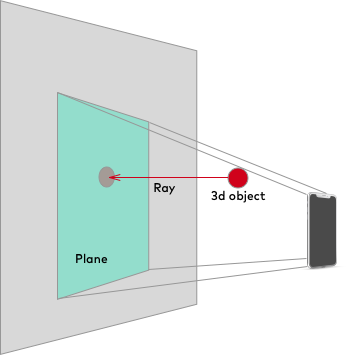
For example, to pop bubbles with a lazer, you can raycast a line away from a
hand anchor to find bubble entities anchored in the scene.
- CollisionCastHit
- raycast(origin:direction:length:query:mask:relativeTo:)
- raycast(from:to:query😷relativeTo:)
- convexCast(convexShape:fromPosition:fromOrientation:toPosition:toOrientation:query:mask:relativeTo:)
Lastly, your scene also provides message buses for coordinating pub/sub events:
Further reading: Scene, ScenePhase
Windows
@main
struct MyApp: App {
  var body: some Scene {
    WindowGroup {
      ContentView()
        .frame(
          minWidth: 100, maxWidth: 400,
          minHeight: 100, maxHeight: 400)
    }
    .windowStyle(.plain)
    .windowResizability(.contentSize)
    .defaultSize(CGSize(width: 600, height: 400))
  }
}- You can request window dimensions, but VisionOS might not respect your request. It clamps out-of-range dimensions to the window’s resizability limits.
- Default window resizability is automatic. Settings windows use contentSize, matching the window size to its content. Other scenes use contentMinSize, restricting only the minimum size.
- Specify resizability strategies with the windowResizability(_:) scene
modifier. For example, use the
.framemodifier to set bounds, like resizing windows to between 100 and 400 points. - You can use
.windowStyle(.plain)to remove the default glass background. - You can’t directly change window position or size after it appears.
- During state restoration, the system restores windows to their previous position and size.
- When an app launches from Home View, the system places its window relative to the Home View.
- A new window from a running app appears in front of an existing window.
To programmatically open a window:
struct NewViewerButton: View {
  @Environment(\.openWindow) private var openWindow
  var body: some View {
    Button("Open Window") {
      openWindow(id: "MY_WINDOW")
    }
  }
}
You can also programmatically check whether multiple windows are allowed.
Volumes
WindowGroup(id: "MY_BALL") { Ball() }
.windowStyle(.volumetric)
.defaultSize(width: 1, height: 1, depth: 1, in: .meters)
Although you can specify a volume’s size in points, it’s typically better to use physical units, like the above code which specifies a size in meters. This is because the system renders a volume with fixed scaling rather than dynamic scaling, unlike a regular window, which means the volume appears more like a physical object than a user interface. For information about the different kinds of scaling, see Spatial layout.
A volume does not ever change size. Developers have no API for resizing windows in VisionOS, and the users cannot resize a volume at runtime.
Actually, it looks like users will be able to resize volumes in VisionOS 2.0.
3D Immersive Space
struct ImmersiveView: View {
  @Environment(AppState.self) var appState
  var body: some View {
    RealityView { content, attachments in
      // add attachments and MyApp entities to `content`
    } update: { content, attachments in
      // runs when ImmersiveView properties change
    } attachments: {
      Attachment(id: "MY_ATTACH) {/* SwiftUI window/volume that will be converted into an entity */}
    }
    .gesture(/* listen for gesture targeted at entity */)
    // ...more gestures
  }
}- Automatic: Default. Uses mixed style unless specified otherwise.
- Full: Unbounded content fully replaces passthrough video, except for user’s
upper limbs (controllable by
scene.upperLimbVisibility(\_:)). Windows render in front of virtual content. - Mixed: Unbounded content with passthrough video. Virtual objects and windows obscure each other.
- Progressive: Radial portal effect partially replaces passthrough. Adjustable by user. Matches full immersion when portal fully replaces passthrough.
You can change the immersion style at runtime, but styles are restricted via the
in paramater in .immersionStyle(selection:in:):
You can change the immersion style after presenting the immersive space by changing the modifier’s selection input, although you can only use one of the values that you specify in the modifier’s second parameter.
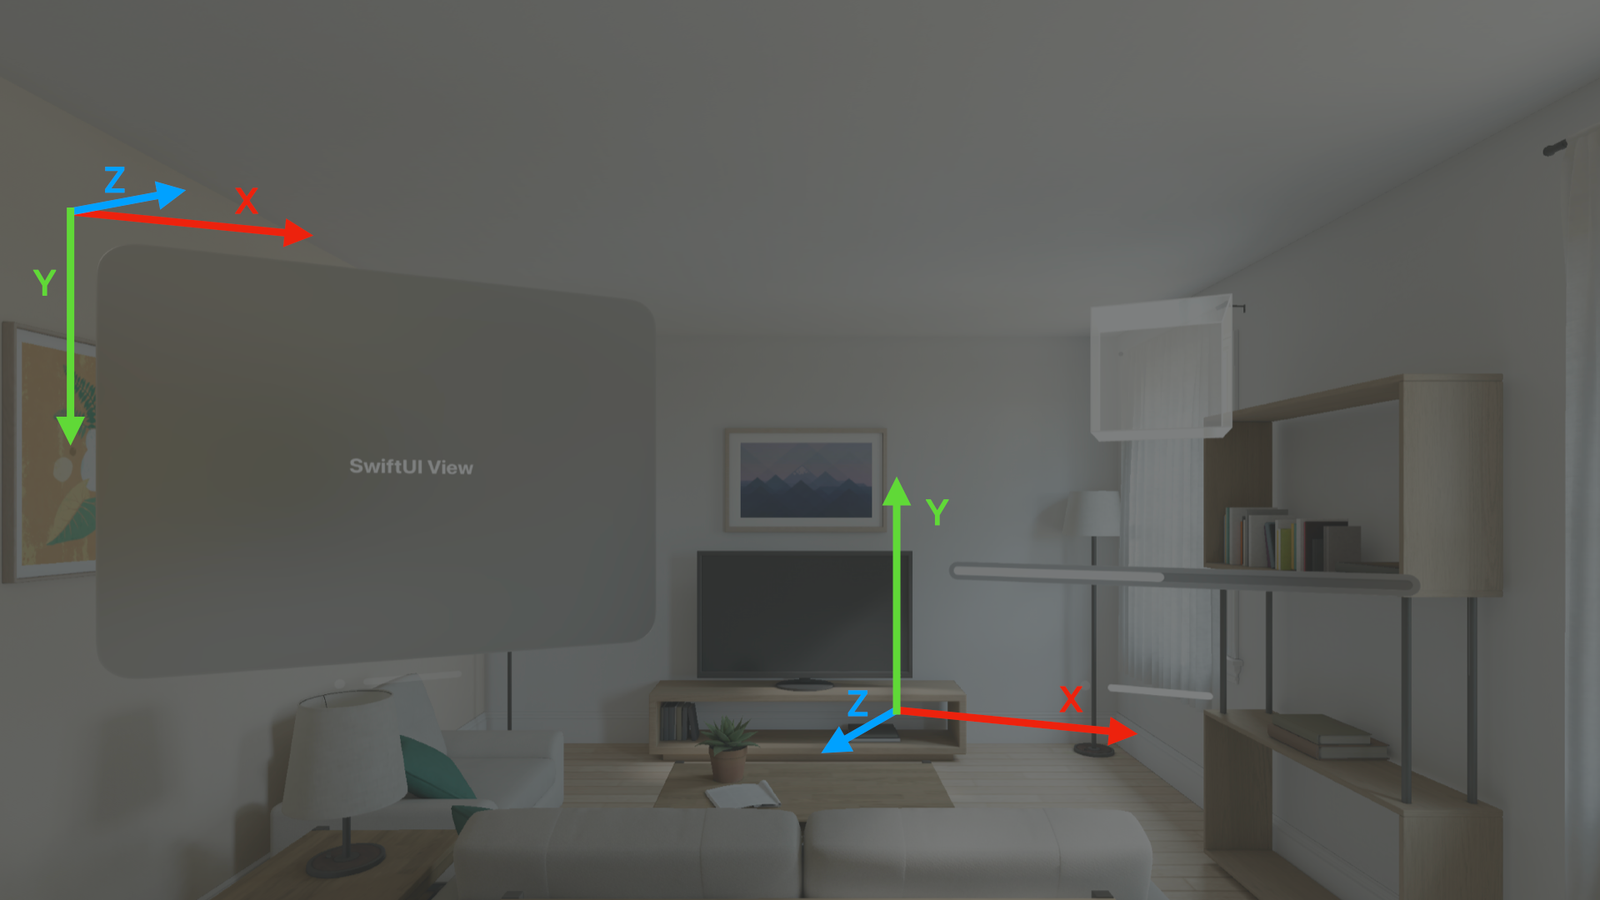
- -x to +x: left to right
- -y to +y: down to up
- -z to +z: front to back
It's very easy to confuse the direction of the z-axis, because larger values go "behind" the user. Also note that RealityKit's y-axis is opposite to SwiftUI's y-axis.
RealityView { content in
  let sphere = ModelEntity(mesh: .generateSphere(radius: 0.1))
  sphere.transform.translation = [0, 1, -2] // "absolutely" position (relative to origin)
  content.add(sphere)
}
RealityView.content is flexibly-sized based on your surroundings. You may need to convert between coordinate spaces.
The origin of an ImmersiveSpace defaults to the user's feet (unclear what happens when lying down), but the origin can change, e.g. the origin changes in a when multiple Spatial Personas enter a SharePlay activity.
You can use scene.immersiveContentBrightness(_) to suggest brightness
levels for immersive spaces. You can use bright/dim/dark presets, or choose
a linear brightness ratio between a standard dynamic range white video frame
and the content background.
SwiftUI coordinate spaces differ from RealityKit coordinate spaces. This is how the SwiftUI ones work:
All geometric properties of a view, including size, position, and transform, are defined within the local coordinate space of the view’s parent.
Use content.convert(...) to switch between RealityCoordinateSpaces and SwiftUI
CoordinateSpaces.
- RealityCoordinateSpace
.camera.scene
- CoordinateSpaceProtocol
.immersiveSpace: The named coordinate space that represents the currently opened ImmersiveSpace scene. If no immersive space is currently opened, this CoordinateSpace provides the same behavior as the .global coordinate space..global: The global coordinate space at the root of the view hierarchy..local: The local coordinate space of the current view..named(some Hashable): Creates a named coordinate space using the given value..scrollView: The named coordinate space that is added by the system for the innermost containing scroll view..scrollView(axis: Axis): The named coordinate space that is added by the system for the innermost containing scroll view that allows scrolling along the provided axis.
You'll be painfully reminded of this whenever you implement gestures:
.gesture(
  DragGesture()
  .targetedToAnyEntity()
  .onEnded { x in
    appState.holding!.transform.translation = x.convert(
      x.gestureValue.translation3D,
      from: .local,
      to: .scene)
  }
)
Quaternion? SIMD3? Matrix4x4? The interactions between different API representations can become painful, and I don't yet have any tidy suggestions. Please email me at [email protected] if you have any good mental models or advice for juggling these values.
Displaying Things
- Scene
- Window
- ContentView
- SwiftUI views
- entities (via Model3D)
- ImmersiveView
- RealityView.Content
content.add(myEntity)content.add(myAttachment)
SwiftUI Views
SwiftUI offers components like Button, DatePicker, Image, VStack, etc.
Apple's official tutorials are a great starting point:
To embed 3D content into a window, use Model3D:
struct ContentView: View {
  var body: some View {
    VStack {

      // load from file
      Model3D(named: "MY_MODEL")
        .frame(width: 300, height: 600)

      // load from url with placeholder
      Model3D(url: URL(string: "https://example.com/elephant.usdz")!) {
          model
            .resizable()
            .aspectRatio(contentMode: .fit)
      } placeholder: {
          Color.green
      }
      .frame(width: 300, height: 600)

      // load from url with phases (good for progress bar, etc)
      Model3D(url: URL(string: "https://example.com/elephant.usdz")!) { phase in
        if let model = phase.model {
            model
        } else if phase.error != nil {
            Color.red
        } else {
            Color.blue
        }
      }

    }
  }
}
RealityView
struct ImmersiveView: View {
  @StateObject private var appState = AppState()
  var body: some View {
    RealityView { content, attachments in

      let mySphere = ModelEntity(mesh: .generateSphere(radius: 0.1))
      content.add(mySphere)

      if let myAttach = attachments.entity(for: "MY_ATTACH") {
        content.add(myAttach)
      }

    } attachments: {
      Attachment(id: "MY_ATTACH) {
        VStack {
          Button("RED") { appState.myColor = .red }
        }
      }
    }
  }
}
In this example, we added a SwiftUI attachment and basic sphere to our scene. I hope you are entertained.
Entities
struct ImmersiveView: View {
  var body: some View {
    RealityView { content in
      if let elephant = try? await ModelEntity(named: "elephant") {
        content.add(elephant) // entity appears at content origin by default
      }
      Task {/* do extra entity stuff in the background */}
    }
  }
}
And now it's finally time to address the elephant in the scene. Let's explore 𝔢𝔫𝔱𝔦𝔱𝔦𝔢𝔰.
To first give you an idea of what you're dealing with, here all the base entities at your disposal: AnchorEntity, BodyTrackedEntity, DirectionalLight, ModelEntity, PerspectiveCamera, PointLight, SpotLight, TriggerVolume, ViewAttachmentEntity
Hierarchies
Various AnchorEntities will be provided to you, e.g. hand anchors, anchors from tracked objects, anchors from people's faces, etc.
Use ModelEntity to display 3D models in your scene -- attach them to anchor
entities (or descendants thereof), e.g. myAnchor.addChild(myModel). These
entity hierarchies become useful when you want to search/manipulate the entities
as a group.
To organize your hierarchy, you can use the following methods on any Entity class: id, scene, findEntity, isActive, anchor, isAnchored, parent, setParent, removeFromParent, children, addChild, removeChild, isEnabledInHierarchy
Enabling/Disabling
To stop simulating/rendering an entity, set entity.isEnabled = false. Reenable
it with entity.isEnabled = true. You can also check whether any parent entity
is disabled via isActive, which is only true when an entity is anchored and
all ancestors are enabled.
Loading Entities
There are myriad ways to load these entities into your scene. Here are some examples from the SwiftSplash demo project:
await withTaskGroup(of: LoadResult.self) { taskGroup in
  for piece in pieces {
    taskGroup.addTask {
      do {
        guard let pieceEntity = try await self.loadFromRCPro(named: piece.key.rawValue,
                             fromSceneNamed: piece.sceneName) else {
          fatalError("Attempted to load piece entity \(piece.name) but failed.")
        }
        return LoadResult(entity: pieceEntity, key: piece.key.rawValue)
      } catch {
        fatalError("Attempted to load \(piece.name) but failed: \(error.localizedDescription)")
      }
    }
  }
}
for await result in taskGroup {
if let pieceKey = pieces.filter({ piece in
piece.key.rawValue == result.key
}).first {
self.add(template: result.entity, for: pieceKey.key)
setupConnectible(entity: result.entity)
result.entity.generateCollisionShapes(recursive: true)
result.entity.setUpAnimationVisibility()
}
// ...
}Here's another loading example from the Diaroma demo project:
To load a Reality Composer Pro scene, use load(named:in:), passing the name of the scene you want to load and the project’s bundle. Reality Composer Pro Swift packages define a constant that provides ready access to its bundle. The constant is the name of the Reality Composer Pro project with “Bundle” appended to the end. In this case, the project is called RealityKitContent, so the constant is called RealityKitContentBundle. Here’s how Diorama loads the map table in the RealityView initializer:
let entity = try await Entity.load(named: "DioramaAssembled", in: RealityKitContent.RealityKitContentBundle)Here's another example, using .generateSphere to construct a ModelEntity from
basic geometry:
struct SphereView: View {
  @State private var scale = false
  var body: some View {
    RealityView { content in
      let model = ModelEntity(
        mesh: .generateSphere(radius: 0.1),
        materials: [SimpleMaterial(color: .white, isMetallic: true)])
      model.components.set(InputTargetComponent())
      model.components.set(CollisionComponent(shapes: [.generateSphere(radius: 0.1)]))
      content.add(model)
    } update: { content in
      if let model = content.entities.first {
        model.transform.scale = scale ? [1.2, 1.2, 1.2] : [1.0, 1.0, 1.0]
      }
    }
    .gesture(TapGesture().targetedToAnyEntity().onEnded { _ in
      scale.toggle()
    })
  }
}
Ignore the component and gesture stuff… for now.
Transforms
To manipulate the position/roation/etc of an Entity, you'll want to use its Transform component. Here are its methods:
- init(scale:rotation:translation:)
- init(pitch:yaw:roll:)
- init(matrix:)
- scale
- rotation
- translation
- matrix
- identity
let sphere = ModelEntity(mesh: .generateSphere(radius: 0.1))
sphere.transform.translation = [0, 1, -2] // relative to anchor
myAnchor.add(sphere)
Gestures will also give you translations to convert. Here's how you might want to move an entity based on the final drag position of a gesture:
.gesture(
  DragGesture()
  .targetedToAnyEntity()
  .onEnded { x in
    appState.myEntity!.transform.translation += x.convert(
      x.gestureValue.translation3D,
      from: .local,
      to: .scene)
  }
)
Physics
let sphere = ModelEntity(
      mesh: MeshResource.generateSphere(radius: 0.1),
      materials: [SimpleMaterial(color: .red, isMetallic: false)],
      collisionShape: .generateSphere(radius: 0.1),
      mass: 1.0)
Straight from the Apple docs:
Models respond to physics simulations because they conform to the HasPhysics protocol. You give them mass and other physical properties with a PhysicsBodyComponent instance, and then apply forces or impulses. The simulator uses a PhysicsMotionComponent to manage the linear and angular velocity of the object. Alternatively, you can selectively circumvent the simulation to control position and velocity yourself. Do this for a given model by setting its physics body mode to PhysicsBodyMode.kinematic.
Models can also collide with one another, and with other entities that conform to the HasCollision protocol. The CollisionComponent provides parameters that let you manage which models collide with each other. It also lets you control the collision shape, which for performance reasons, is typically simpler than the visual geometry.
In other words, give your entities some mass and then use methods to apply forces, torque, impulses, etc. You can use downward force to simulate gravity, and an upward impulse to simulate a throw.
For performance reasons, the shapes that collide with each other are not the rendered shapes. This is exactly why things in video games appear to phase through each other when they get close! As your shapes get more complex, this effect can become more apparent. You can imagine that simple cubes and spheres may not capture the nuance of a high-speed collision between two horses. So you'll want to create the simplest mesh that produces the illusion of good physics.
The following
ShapeResource
functions are useful for defining collision shapes: .offsetBy, .bounds,
.generateBox, .generateSphere, .generateCapsule, .generateConvex,
.generateStaticMesh
You might find generateCollisionShapes useful when working with hierarchies.
For more complex stuff, you'll want MeshResource.
And once all this physical stuff is set up, VisionOS will automatically update the entities' Transform components over time.
You can create arbitrary surfaces to interact with, or find/use surfaces in your surroundings. More on that later.
Further reading: scene hierarchies for efficient physics simulations, handling different sized objects, controlling collisions
Anchors
let world = ARWorldTrackingConfiguration()
world.planeDetection = [.horizontal, .vertical]
session.run(world)

let planeAnchor = AnchorEntity(plane: .horizontal)
planeAnchor.addChild(ModelEntity(mesh: .generateBox(size: 0.1)))
scene.anchors.append(planeAnchor)

let imageAnchor = AnchorEntity(anchor: ARImageAnchor(referenceImage: "EXAMPLE"))
imageAnchor.addChild(ModelEntity(mesh: .generateText("Informative Text", extrusionDepth: 0.05, font: .systemFont(ofSize: 0.1))))
scene.anchors.append(imageAnchor)
RealityKit places anchors based on the anchoring component’s target property. For example, configure an anchor entity to find a detected horizontal surface like a table or floor. RealityKit will place that anchor once it detects an appropriate horizontal plane.
Some anchor entities may not show up in your scene if RealityKit fails to detect an appropriate place for them, e.g. an anchor entity with an image target won’t show up until RealityKit detects the specified image in the real world.
Add anchor entities directly to your scene’s anchors collection or anywhere else in the scene hierarchy by adding them to the children collection of another entity in your scene. AnchorEntity is a subclass of Entity, so you can make an anchor entity a child of any other entity.
RealityKit may move anchor entities as the scene updates, changing their
location and rotation relative to their parent, even if your code never
modifies its .transform property.
Sensing Stuff
ImmersiveSpace(id: "MY_SPACE") {
 ImmersiveView()
  .task {
    let planeData = PlaneDetectionProvider(alignments: [.horizontal])
    if PlaneDetectionProvider.isSupported {
      do {
        try await session.run([planeData])
        for await update in planeData.anchorUpdates {
          // ...
        }
      } catch {
        print("ARKit session error \(error)")
      }
    }
  }
}
.immersionStyle(selection: $immersionState, in: .mixed)
The VisionOS ARKit guide is very good:
ARKit in visionOS offers a new set of sensing capabilities. You adopt these capabilities individually in your app, using data providers to deliver updates asynchronously. The available capabilities include:
- Plane detection. Detect surfaces in a person’s surroundings and use them to anchor content.
- World tracking. Determine the position and orientation of Apple Vision Pro relative to its surroundings and add world anchors to place content.
- Hand tracking. Use the person’s hand and finger positions as input for custom gestures and interactivity.
- Scene reconstruction. Build a mesh of the person’s physical surroundings and incorporate it into your immersive spaces to support interactions.
- Image tracking. Look for known images in the person’s surroundings and use them as anchor points for custom content.
For each of these APIs, ARKit exposes anchor entities corresponding to real-world phenomena. You will likely either (A) attach your entities to these ARKit anchors or (B) record changes in these anchors to apply elsewhere.
- plane detection demo project
- world tracking demo project
- hand tracking demo project
- scene reconstruction demo project
- image tracking demo project
Bonus: body/face tracking
ARKit sessions will not provide anchors (nor updates) unless you're in a full
immersive space and other apps are hidden. You have to run
\.openImmersiveSpace before
ARKitSession.run()
will work.
View.task
is a great way to run an async task before the ImmersiveView appears.
It's important to note that
ARKit hand-tracking
is completely separate from
RealityView
.gesture(...) methods.
Gestures
In SwiftUI, you can attach gestures to specific views:
VStack {
    Image(systemName: "star.fill")
    .gesture(
      TapGesture().onEnded {
        print("TAPPED IMAGE")
      }
    )
}
.gesture(
  TapGesture().onEnded {
    print("TAPPED VSTACK")
  }
)
In RealityKit, your gestures live at the RealityView level and will be targeted to particular entities within the scene:
RealityView {/* ... */}
.gesture(
  TapGesture()
  .targetedToAnyEntity()
  .onEnded {
    print("TAPPED SOMETHING")
  }
)
.gesture(
  TapGesture()
  .targetedToEntity(myFavoriteDolphin)
  .onEnded {
    print("TAPPED HENRIETTE")
  }
)
.gesture(
  TapGesture()
  .targetedToEntity(where: myDolphins)
  .onEnded {
    print("TAPPED DOLPHIN")
  }
)
Here are your three entity filters:
Use QueryPredicate to target entity subtypes. You can also reuse these queries to find entities within a scene.
You can specifically filter "pinches" with .handActivationBehavior. For anything besides pinching, you'll need to use a hand skeleton to figure out what's going on. More on that later.
InputTargetComponent
myEntity.components.set(InputTargetComponent())
myEntity.components.set(CollisionComponent(shapes: [.generateSphere(radius: 0.1)]))
Gestures only work on entities with collision components.
Seriously, this is pretty important: gestures only work on entities with collision components. InputTargetComponent ain't enough.
Luckily, InputTargetComponent is hierarchical, so any descendants with collision components can be targeted for gestures. You can "hide" a descendant entity from gestures by adding a disabled input component:
let inputComponent = InputTargetComponent()
inputComponent.isEnabled = false
myDescendantEntity.components.set(inputComponent)
Input Types
There are two
types of input
in VisionOS to use in your components, e.g.
InputTargetComponent(allowedInputTypes: .indirect):
.indirect: use gaze tracking and become a powerful Steve Jobs padawan.direct: use your body to interact with entities like a caveman
And this naturally brings us to gesture types. Everything works as you'd expect,
except the "direct" input makes things weird.
SpatialTapGesture
is .direct, while all others have .direct and .indirect handling. But
almost everything will be .indirect, because we're civilized, dammit.
I don't actually have a strong opinion on this, I'm just performing a comedic bit.
Gesture Types
- TapGesture: look at something and tap index finger to thumb
- LongPressGesture: look at something and hold index finger against thumb
- DragGesture: look at something, hold index finger against thumb, while moving hand around
- RotateGesture: look at something and rotate it like a steering wheel
- RotateGesture3D: look at something and rotate it like a detached steering wheel
- MagnifyGesture: look at something and bring pinching hands away/together
- SpatialTapGesture: touch an entity directly with a finger (must be within reach)
Gesture Hand Poses
DragGesture()
.targetedToAnyEntity()
.onEnded { gesture in
  appState.myEntity?.setPosition(
    simd_float(gesture.gestureValue.inputDevicePose3D!.position.vector),
    relativeTo: nil)
}
For some gestures, you can observe hand orientation changes outside of ARKit hand-tracking sessions.
Gesture Ambiguity
Because multiple tap gestures on the same RealityView execute with a different number of taps, multiple gestures may be called at once. If a player double taps an entity, for example, both the single tap and the double tap gesture code get called, and the app has to determine which one to execute. Swift Splash makes this determination by using a Boolean state variable. If a player single taps, it sets that variable — called shouldSingleTap — to true. Then it waits for a period of time before executing the rest of its code. If shouldSingleTap gets set to false while it’s waiting, the code doesn’t execute. When SwiftSplash detects a double tap gesture, it sets shouldSingleTap to false, preventing the single-tap code from firing when it executes the double-tap code.
struct TapGestureView: View {
  @State private var shouldSingleTap = false
  var body: some View {
    RealityView {/* ... */}
    .gesture(
      TapGesture(count: 1)
      .targetedToAnyEntity()
      .onEnded { _ in
        Task {
          self.shouldSingleTap = true
          try? await Task.sleep(for: .seconds(100))
          print("SINGLE TAP")
        }
      }
    )
    .simultaneousGesture(
      TapGesture(count: 2)
      .targetedToAnyEntity()
      .onEnded { _ in
        self.shouldSingleTap = false
        print("DOUBLE TAP")
      }
    )
  }
}
Hand Shapes
for await update in self.handTracking.anchorUpdates {
  switch update.event {
  case .added, .updated:
    let hand = update.anchor
    let pose = Pose3D(hand.originFromAnchorTransform)
    guard let pose else { continue }
    let isPalmUp = pose.isApproximatelyEqual(
      to: Pose3D(
        position: pose.position,
        target: Point3D(x:0,y:0,z:0),
        up: Vector3D(x:0,y:1,z:0)
      )
    )
    let isRingIn = hand.handSkeleton?.joint(.ringFingerTip).anchorFromJointTransform.columns.3[SIMD3(0,1,2)].z ?? 0 < -0.1
    let isRingOut = hand.handSkeleton?.joint(.ringFingerTip).anchorFromJointTransform.columns.3[SIMD3(0,1,2)].z ?? 0 > 0.1
    let isPointerOut = hand.handSkeleton?.joint(.indexFingerTip).anchorFromJointTransform.columns.3[SIMD3(0,1,2)].z ?? 0 > 0.1
    if isPalmUp && isRingOut {
      print("LOOKING AT PALM")
    }
    if isPointerOut && isRingIn {
      print("SHOOTING")
    }
  }
}
I really hope that Apple produces a nicer API for hand shape recognition in the future. As of now, it's still pretty low-level, and hands are naturally complex.
To reduce complexity of hand recognition, I focus on four dimensions and ignore everything else:
- palm orientation
- index finger tip
- ring finger tip
- thumb tip
Because of the musculature of the human hand, the ring finger is a very good proxy for the middle finger and pinky, i.e. it's difficult to extend your ring finger by itself.
On Your Own
As you learn new APIs, two particular XCode shortcuts are extremely helpful for accessing documentation:
- ⇧⌘0: open fast, searchable, offline documentation (much better interface than the web docs IMO)
- ⌥⌘3: pull up the "quick help" sidebar (I pretty much always leave it open)
Starter Projects
VisionOS:
RealityKit:
- Building an Immersive Experience with RealityKit
- Transforming RealityKit entities using gestures
- SwiftStrike: Creating a Game with RealityKit
- Creating a Game with Reality Composer
- Creating a game with scene understanding
- Controlling Entity Collisions in RealityKit
- Simulating physics with collisions in your visionOS app
- Simulating particles in your visionOS app
- Construct an immersive environment for visionOS
ARKit:
- Incorporating real-world surroundings in an immersive experience
- Placing content on detected planes
- Tracking specific points in world space
Videos
WWDC23:
- Explore immersive sound design
- Enhance your iPad and iPhone apps for the Shared Space
- Meet Safari for spatial computing
- Meet UIKit for spatial computing
- Run your iPad and iPhone apps in the Shared Space
- Build spatial experiences with RealityKit
- Develop your first immersive app
- Meet SwiftUI for spatial computing
- Bring your Unity VR app to a fully immersive space
- Build great games for spatial computing
- Build spatial SharePlay experiences
- Create 3D models for Quick Look spatial experiences
- Create a great spatial playback experience
- Create accessible spatial experiences
- Create immersive Unity apps
- Deliver video content for spatial experiences
- Design for spatial user interfaces
- Design spatial SharePlay experiences
- Discover Metal for immersive apps
- Discover Quick Look for spatial computing
- Elevate your windowed app for spatial computing
- Explore App Store Connect for spatial computing
- Explore rendering for spatial computing
- Explore the USD ecosystem
- Get started with building apps for spatial computing
- Go beyond the window with SwiftUI
- Meet ARKit for spatial computing
- Optimize app power and performance for spatial computing
- Take SwiftUI to the next dimension
- Evolve your ARKit app for spatial experiences
WWDC24:
- What’s new in SwiftUI
- Break into the RealityKit debugger
- Create enhanced spatial computing experiences with ARKit
- Customize spatial Persona templates in SharePlay
- What’s new in USD and MaterialX
- What’s new in Quick Look for visionOS
- Get started with HealthKit in visionOS
- Build immersive web experiences with WebXR
- Bring your iOS or iPadOS game to visionOS
- Discover area mode for Object Capture
- Optimize your 3D assets for spatial computing
- Create custom hover effects in visionOS
- Design interactive experiences for visionOS
- Enhance the immersion of media viewing in custom environments
- Create custom environments for your immersive apps in visionOS
- Explore game input in visionOS
- Optimize for the spatial web
- Build a spatial drawing app with RealityKit
- Dive deep into volumes and immersive spaces
- Introducing enterprise APIs for visionOS
- Explore multiview video playback in visionOS
- Render Metal with passthrough in visionOS
- Meet TabletopKit for visionOS
- Build compelling spatial photo and video experiences
- Enhance your spatial computing app with RealityKit audio
- Create enhanced spatial computing experiences with ARKit
- Discover RealityKit APIs for iOS, macOS and visionOS
- Compose interactive 3D content in Reality Composer Pro
- Explore object tracking for visionOS
- Design great visionOS apps